
A recessed light cover is far more than a decorative trim piece. For facility managers and contractors, it’s a critical sealing component that stops significant energy loss. In any commercial property with dozens—or hundreds—of recessed lights, each unsealed fixture is like a small, open window in the ceiling, constantly leaking expensive conditioned air and driving up utility costs.
Why Recessed Light Covers Are a Secret Weapon for Energy Savings
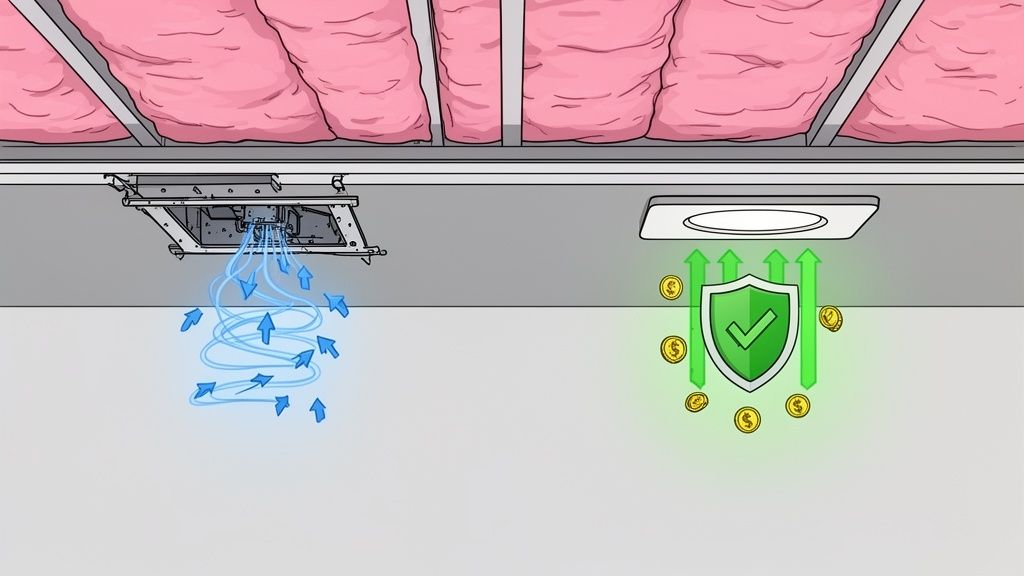
In commercial buildings, recessed lights are ubiquitous, dotting the ceilings of offices, hallways, and conference rooms. While they provide excellent illumination, they often create hundreds of hidden holes in a building’s thermal envelope. Each unsealed fixture becomes a direct pathway for air leakage.
This is often called the “chimney effect” or stack effect. Warm, conditioned air naturally rises and escapes through these gaps into the unconditioned attic or plenum space. During colder months, your heating system must work overtime to replace that lost heat. In the summer, the opposite happens: hot attic air seeps into cooled spaces, forcing your HVAC system to run longer and harder.
For facility managers, property owners, and contractors, tackling this issue is a direct path to significant utility bill reductions.
Consider this: a building with 200 unsealed recessed lights has the equivalent of a two-foot by two-foot hole cut directly into its ceiling. Sealing these fixtures with products like an airtight recessed light cover is one of the most effective ways to improve building performance and cut operational costs.
The Financial Impact of Air Leakage
It’s easy to underestimate the financial drain these small openings cause. The cumulative effect of hundreds of tiny leaks creates a constant energy bleed that inflates HVAC expenses, which can account for up to 40% of a commercial building’s total energy consumption. A properly installed recessed light cover stops this air movement, effectively plugging these costly holes.
The market reflects this push for efficiency. The global recessed lighting market was valued at around USD 36.74 billion in 2026 and is projected to grow to over USD 94 billion by 2035. This rapid growth is fueled by the shift to energy-efficient LED solutions, demonstrating how focused the industry is on cutting operational costs for businesses.
A Foundational Step in Energy Conservation
By installing the correct recessed light cover, you’re not just adding an accessory; you are restoring the integrity of your ceiling’s air and thermal barrier. This single move delivers several key benefits for any commercial property:
- Reduced HVAC Load: By preventing air leakage, covers help maintain stable indoor temperatures, which means less strain on your heating and cooling systems.
- Lower Utility Bills: Less HVAC runtime translates directly to lower monthly energy bills and a healthier bottom line.
- Improved Occupant Comfort: Sealing these air leaks helps eliminate drafts and inconsistent temperatures, creating a more comfortable environment for employees and tenants.
Addressing this is a fundamental step in any serious energy conservation strategy. When you combine sealed light fixtures with other technologies, the savings compound. For instance, you can learn how to cut lighting costs with an occupancy sensor, which ensures lights are only on when spaces are occupied. This guide provides the practical know-how to select and install the right covers for maximum energy conservation and safety.
Decoding the Ratings on a Recessed Light Cover
When evaluating a recessed light cover, you’ll encounter various ratings. These aren’t just suggestions; they’re the language of safety, energy performance, and building code compliance. For any facility manager or contractor, understanding this language is fundamental to protecting the building, its occupants, and the budget.
Think of these ratings as non-negotiable instructions on where and how a fixture can be installed. Misinterpreting them can lead to fire hazards, failed inspections, and inflated energy bills. Let’s break down the most important ratings you’ll encounter.
IC-Rated for Insulation Contact
An IC-Rated (Insulation Contact) fixture is specifically built to be in direct contact with insulation. It acts as a fire-safe enclosure for the light. These housings are designed to manage their own heat, preventing the fixture from becoming a fire hazard even when completely buried in insulation.
This rating is an absolute must for any ceiling that is insulated or will be in the future. Using an IC-rated recessed light or cover allows you to maximize your building’s thermal envelope without introducing a serious fire risk. If you’re planning an energy efficiency project that involves adding insulation, specifying IC-rated products is step one.
Non-IC for Clearance
Conversely, a Non-IC rated fixture requires “breathing room.” The rule is simple: you must maintain at least three inches of clearance from any insulation. These are typically older or more specialized housings that cannot handle the heat buildup when enclosed.
If your building has old non-IC fixtures, you absolutely cannot simply blow new insulation over them. This is a massive fire hazard. Your only options are to maintain that clearance—which compromises the effectiveness of your insulation—or upgrade the fixture with a proper recessed light cover for non-IC fixtures or a full IC-rated housing.
One of the most dangerous assumptions is thinking a cooler LED bulb makes a Non-IC fixture safe to cover. While the bulb itself runs cooler, the driver and fixture housing still produce heat. Trapping that heat can cause premature LED failure and, more importantly, a very real fire risk.
Airtight for Energy Efficiency
An Airtight (AT) rating is your single best tool for stopping energy waste. An AT-rated fixture is gasketed and sealed to block airflow between the conditioned room below and the unconditioned attic or plenum space above.
This is where the real money is saved. In a large commercial building, hundreds of tiny air leaks from non-airtight lights can add up to a huge drain on your HVAC system. Sealing these holes with airtight covers will produce a noticeable drop in your heating and cooling costs.
To earn its airtight certification, a fixture must allow less than 2.0 cubic feet of air per minute (CFM) to pass through it when tested at 75 Pascals of pressure. If energy conservation is your primary goal, this is a key certification to look for.
To help you sort through these critical specs, here’s a quick-reference table summarizing the most common ratings and their commercial applications.
Recessed Light Cover Ratings at a Glance
| Rating Type | Description | Best For (Commercial Application) |
|---|---|---|
| IC-Rated | Designed for direct contact with insulation. Manages heat to prevent fire hazards. | Insulated ceilings, plenums, attics. Essential for energy efficiency retrofits. |
| Non-IC | Requires 3-inch clearance from all insulation. Cannot handle heat buildup. | Uninsulated ceilings or open plenum spaces where clearance is guaranteed. |
| Airtight (AT) | Sealed and gasketed to prevent airflow, limiting air leakage to under 2.0 CFM. | Any conditioned space below an unconditioned attic/plenum to reduce HVAC costs. |
| Fire-Rated | Maintains the fire-resistance rating of a ceiling assembly for a specific duration (e.g., 1-2 hours). | Multi-story buildings, apartment complexes, hotels, and any fire-rated ceiling. |
| Wet/Damp-Rated | Damp-rated for moist areas (bathrooms, covered porches). Wet-rated for direct water exposure (showers, soffits). | Bathrooms, locker rooms, pool areas, outdoor eaves, and any location exposed to moisture or water. |
Understanding these ratings helps you make smarter, safer, and more cost-effective decisions for your facility’s lighting infrastructure.
Other Critical Commercial Ratings
Beyond the big three, a couple of other ratings are mandatory in specific commercial settings.
- Fire-Rated Covers: These are non-negotiable in multi-story buildings or anywhere with a fire-rated ceiling assembly. A fire-rated recessed light is built to preserve the ceiling’s fire barrier, helping contain a fire and stop its spread between floors for a set time (usually one or two hours). This is a life-safety requirement found in nearly all commercial building codes.
- Wet/Damp-Rated Covers: Location is everything. A damp-rated cover is suitable for areas with ambient moisture, like bathrooms and kitchens. For showers, outdoor soffits, or any spot that could be hit with spray, you need a true wet-rated cover built to withstand direct water contact.
Often, a combination is necessary. A recessed light in a hotel bathroom, for example, might need to be IC-rated, Airtight, Fire-Rated, and Damp-Rated to meet all requirements for code, safety, and performance.
The Business Case for Upgrading Your Light Covers
Understanding the technical ratings on a recessed light cover is one thing; connecting those specs to what truly matters for your business—saving money and reducing risk—is another. For any facility manager, contractor, or business owner, these small components represent a significant operational win.
Think of it this way: an investment in the right covers pays for itself repeatedly through lower energy bills, improved safety, and a healthier building.
The most obvious financial win is energy savings. An Airtight (AT) rated recessed light cover is specifically built to stop air leakage, which is a massive, hidden cost in most commercial buildings.
Picture a mid-sized office with 500 recessed lights. If those fixtures aren’t sealed, it’s the same as having hundreds of small, open holes in your ceiling. Those openings create a constant, invisible drain on your HVAC system, forcing it to run longer and harder to maintain a stable temperature. Sealing these gaps with airtight covers is like closing 500 tiny windows, leading to real energy savings visible on your bill every month.
Quantifying the Impact of Energy Savings
The financial case for upgrading gets even stronger at scale. These upgrades are especially critical in tenant improvement projects, where long-term energy efficiency directly affects operating costs and property value. By reducing the HVAC load, you’re not just saving money; you’re also extending the lifespan of your expensive mechanical equipment and making the space more comfortable for occupants.
This push for efficiency is driving the entire market. North America is the biggest global market for recessed lighting, valued at USD 16.8 billion in 2026 and expected to hit USD 38.2 billion by 2035. That growth is fueled by new regulations promoting sustainable energy and the switch to advanced lighting. For businesses, this confirms that investing in efficiency retrofits like new light covers is a financially sound move with serious market backing. You can dive deeper into these trends with the recessed lighting market projections from DataHorizzon Research.
Of course, the benefits aren’t limited to energy savings. The safety aspect is just as critical.
Mitigating Risks and Ensuring Compliance
When it comes to safety, an IC-rated recessed light cover is your best defense against a common fire risk. Its purpose is to prevent insulation from touching hot fixture parts. In older buildings with non-IC fixtures, blowing in new insulation without this protection creates a serious fire hazard. An IC-rated cover eliminates that danger, providing peace of mind while bringing your building up to modern safety standards.
For any multi-story commercial building, fire-rated covers are not just a good idea—they are an absolute must for code compliance. Here’s why they are non-negotiable:
- Structural Integrity: A standard ceiling is engineered to act as a fire barrier. Every time you cut a hole for a light, you compromise that barrier.
- Containment: A fire-rated cover is designed to restore the ceiling’s original fire-resistance rating, usually for one to two hours.
- Occupant Safety: By containing a fire on a single floor for a longer period, these covers buy precious time for people to evacuate safely.
Choosing the right rated cover isn’t just about checking a box; it’s fundamental risk management. The small upfront cost of a compliant, fire-rated recessed light cover is nothing compared to the potential liability and human cost of a fire spreading unchecked through your building.
At the end of the day, turning a minor component into a major operational asset is just smart business. When you also swap in energy-saving LED bulbs during your retrofit, the combined savings on lighting and HVAC will accelerate your return on investment, making it a clear, data-backed decision for any forward-thinking organization.
How to Select the Right Recessed Light Cover for Retrofits
For any energy auditor or contractor, selecting the right recessed light cover during a retrofit is a small decision with huge consequences. A mistake can lead to expensive rework, safety hazards, and missed energy-saving goals. Get it right, and you deliver real value.
A successful retrofit starts with good intel gathered from the job site. Before ordering products, a quick but thorough check of the existing fixtures is essential. These simple measurements and observations will dictate your needs.
Start with Accurate Measurements
First, you need to measure the existing fixture, often called a “can light.” To ensure any new cover or trim fits correctly, you’ll need two key dimensions.
- Measure the Diameter: Use a tape measure to find the inside diameter of the can light’s opening. Common commercial sizes are typically 4, 5, or 6 inches, but always measure to be certain.
- Measure the Depth: Measure the vertical depth from the ceiling plane to the top of the can’s housing. This is critical to ensure your new cover will be deep enough to completely enclose the fixture.
Getting these two numbers right is foundational. An ill-fitting cover is useless, and a minute of precision here will save significant rework later.
Assess the Insulation Situation
With dimensions in hand, your next job is to determine the insulation status around the fixture. This is the most important step for fire safety and code compliance. You must know if you’re dealing with an IC-rated or a Non-IC fixture.
The most reliable method is to look in the attic or plenum space. If insulation is packed tightly against the can’s housing, it’s almost certainly an IC-rated (Insulation Contact) fixture. If you see a deliberate gap of at least three inches of clear space on all sides, you’re looking at a Non-IC setup. If you can’t get into the plenum, look for a label inside the can itself, but be aware that labels on older units can be hard to read or missing.
Pro Tip: A common and dangerous mistake is assuming that a new, cooler-running LED retrofit bulb makes it safe to cover a Non-IC fixture with insulation. This is a myth. The LED’s driver still produces heat, and trapping it can lead to premature failure and a very real fire hazard.
Ensure Compatibility with LED Retrofits
Modern LED retrofit kits manage heat differently than old incandescent bulbs. An incandescent bulb radiated heat out into the room. LEDs, however, push heat backward into the fixture using a heat sink. The recessed light cover you select must be designed to allow this heat to dissipate properly to protect the LED’s lifespan and performance.
When evaluating covers, check the product specifications for compatibility with LED retrofits. Quality covers, like those available from suppliers such as Conservation Mart, are specifically engineered for the unique thermal needs of LEDs. This is the only way to ensure your new, energy-efficient upgrade doesn’t burn out prematurely from overheating.
Once you’ve done your homework on these three points, you can confidently choose the right cover. Your findings will point you to one of these three solutions:
- For Insulated Ceilings: If insulation is present or planned, you must use an IC-rated and Airtight (AT) cover. This combination addresses both fire safety and energy efficiency by stopping air leaks.
- For Non-IC Fixtures: If you’re dealing with an existing non-IC fixture that cannot be replaced, you must use a cover large enough to enclose the can while still maintaining the required three-inch clearance from any insulation.
- For Fire-Rated Assemblies: In any building with more than one floor, you’ll likely encounter fire-rated ceilings. For these, you must use a dedicated fire-rated recessed light cover. Many of these are also IC and AT rated, offering a complete all-in-one solution for safety, code compliance, and energy savings.
A Contractor’s Checklist for Installation and Sealing
A good recessed light cover is only half the solution. The real value is realized during installation—this is what transforms a piece of hardware into a building component that saves energy and enhances safety. For any contractor or maintenance team, a consistent process is key to achieving predictable, high-quality results.
A sloppy install can completely negate the benefits of the cover. Following a clear checklist ensures every cover you fit performs as intended, delivering maximum energy savings and keeping the facility compliant.
Pre-Installation Safety and Access
Before touching a fixture, safety is the first priority. No exceptions.
Lock out and tag out the circuit breaker for the lights you’re working on. This is a non-negotiable safety protocol to prevent electric shock. Always double-check that the power is off with a non-contact voltage tester before proceeding.
Next, gather your tools and Personal Protective Equipment (PPE):
- Safety Glasses: A must-have for protecting your eyes from dust and debris.
- Gloves: Protect your hands from sharp edges and sealant.
- Dust Mask: Essential if working near insulation or in dusty ceiling plenums.
- Headlamp: Provides direct, hands-free light where you need it most—inside the fixture housing.
With your gear sorted, it’s time to access the fixture. Most work can be done from below, but in commercial spaces with drop ceilings or attic access, you may need to get above the fixture to properly place and seal the new cover.
Installation and Sealing Protocol
Once you have the correct cover and safety checks are complete, the installation is straightforward, but the details matter.
- Remove Existing Trim and Bulb: Gently remove the old bulb and trim ring. Inspect the inside of the housing for any damaged wiring or other issues.
- Position the New Cover: From the attic or plenum side, place the new cover over the can light housing. Ensure it sits completely flush against the drywall or ceiling deck. Any gaps are problematic.
- Secure the Cover: Use the screws or clips provided with the cover to fasten it to the joists or ceiling deck. It should be stable and immovable, especially before insulation is placed around it.
Now for the final, and most important, step for energy savings. This is where many projects fall short. You must create a perfect air barrier.
Critical Final Step: Sealing the Seams
Use a fire-rated caulk or mastic to meticulously seal every seam where the edge of the cover meets the drywall. Don’t forget to seal around any wire penetrations. Skipping this or leaving even tiny gaps undermines the cover’s entire purpose.
A common mistake is using the wrong sealant (one that isn’t fire-rated) or running a quick, incomplete bead that leaves cracks for air to pass through. A single error here can eliminate the intended energy savings.
For a deeper dive into the fixtures themselves, our guide on LED recessed lighting is a great companion read. A professional installation process is what ensures the product actually delivers on its promised ROI.
Frequently Asked Questions for Facility Managers
As a facility manager or contractor, you’re always juggling performance, safety, and the bottom line. When it comes to lighting retrofits, the small details can make a huge difference. Here are the questions we hear most often from pros in the field about picking and installing the right recessed light cover.
Can I Use an LED Bulb in My Old Non-IC Light and Cover It with Insulation?
No. This is a critical safety mistake and one of the most common misconceptions we encounter. While a tempting shortcut, it is a dangerous one.
Even though a modern LED bulb runs much cooler than an old incandescent, the fixture’s housing is not built for direct contact with insulation. The real issue is the LED driver, which powers the bulb and still generates significant heat.
If you smother a Non-IC fixture with insulation, you trap all that heat. This can cause the LED to fail prematurely and, more importantly, creates a serious fire hazard. To do this correctly, you must either add a proper IC-rated recessed light cover or replace the entire housing before insulating.
Are Airtight Covers Worth the Extra Cost for a Large Building?
Absolutely. For a large commercial facility, airtight (AT) rated covers deliver one of the fastest and most compelling returns on investment in any energy efficiency project. The upfront cost may be slightly higher per fixture, but the long-term savings are massive.
In a building with hundreds of recessed lights, every tiny air leak adds up to a major breach in your building’s thermal envelope. That constant air exchange forces your HVAC system to work overtime, leading to significant energy waste.
We’ve found the payback period for airtight covers is typically very quick in a commercial setting, often just a year or two. This isn’t just a one-time fix; it’s a permanent reduction in your operational costs, putting real money back in your budget every single month.
For any business serious about reducing utility bills, choosing an AT-rated recessed light cover is a sound financial decision.
What Is the Difference Between a Fire-Rated Cover and an IC-Rated Cover?
This is a crucial distinction, especially for code compliance and life safety. An IC-rated cover is certified for Insulation Contact, making it safe to bury in insulation. A fire-rated cover, on the other hand, is specifically built to restore the fire-resistance rating of a ceiling after a hole has been cut for a light.
In multi-story commercial buildings, fire-rated ceilings are mandatory. They are designed to contain a fire and prevent its spread between floors for a specified time (e.g., one or two hours).
While many fire-rated covers are also IC-rated, the reverse is not always true. You must use a designated fire-rated product wherever required by local building code to maintain the integrity of that fire barrier. Do not confuse the two.
How Do I Know If I Need a Retrofit or a Whole New Fixture?
This decision comes down to the condition of your existing “cans” and your long-term goals. A retrofit is a fantastic, cost-effective option if your current recessed lighting housings are in good shape and compatible with modern LED bulbs. In that case, adding a recessed light cover and a new LED kit is a quick and easy win.
However, if the housings are old, damaged, incompatible with efficient upgrades, or are non-IC rated in a space that requires insulation, replacing the entire fixture is usually the smarter long-term investment. A new, fully integrated IC-rated and airtight unit locks in maximum performance, safety, and energy savings for years to come.
At Conservation Mart, LLC, we’re committed to providing practical solutions that help businesses and organizations cut energy costs and improve building performance. For more expert tips, product guides, and conservation strategies, visit our Energy & Water Conservation Blog.