
 Spray foam insulation kits are a powerful solution for sealing air leaks, improving energy efficiency, and insulating hard-to-reach spaces. However, getting professional-quality results depends heavily on proper preparation, technique, and temperature control. Whether you’re a first-time DIYer or a seasoned installer, following best practices can help you avoid common mistakes and maximize foam performance.
Here are the top 10 tips for spraying spray foam kits to ensure smooth application, consistent yield, and long-lasting results.
1. Spray Continuously to Prevent Clogs
One of the most important rules when using a spray foam kit is to spray continuously. Try to spray through the entire kit without pausing for more than a few seconds.
Long pauses can cause:
- Foam to crystallize in the hose
- Chemical imbalance between components
- Clogged spray nozzles and wasted material
Pro Tip: Plan your application path in advance so you can spray steadily without unnecessary stops. If you must stop, be prepared to change the nozzle before resuming.
2. Maintain the Ideal Spraying Temperature (65–85°F)
Temperature plays a critical role in spray foam performance. For best results, spray foam kits should be applied when ambient and surface temperatures are between 65°F and 85°F.
Spraying outside this range can lead to:
- Poor foam expansion
- Uneven cell structure
- Reduced insulation value (R-value)
Always check the temperature of the air and the surfaces you’re spraying before starting.
3. Store Spray Foam Kits Properly Before Use
Proper storage is just as important as proper spraying. Spray foam kits should be:
- Stored above 50°F at all times
- Conditioned to at least 70°F before use
For best results, place the kit in a climate-controlled area for at least 12 hours prior to application. This ensures the chemicals are fully warmed and mixed correctly during spraying.
4. Spray Evenly for Consistent Coverage
Uneven spraying can result in weak spots, gaps, or wasted foam. Always aim to spray evenly using smooth, controlled passes.
Best practices include:
- Holding the spray gun at a consistent distance from the surface
- Moving at a steady pace
- Applying foam in thin layers rather than thick passes
Even application leads to better adhesion, uniform expansion, and improved insulation performance.
5. Prepare and Clean the Surface Thoroughly
Spray foam adheres best to clean, dry, and debris-free surfaces. Before spraying, remove:
- Dust and dirt
- Oil or grease
- Loose insulation or old materials
Moisture or contaminants can prevent proper adhesion and reduce foam effectiveness.
6. Shake and Mix the Tanks Correctly
Before attaching hoses and spraying, make sure both tanks are properly mixed. Most manufacturers recommend shaking or agitating the tanks to ensure chemical consistency.
Failing to mix properly can cause:
- Off-ratio foam
- Brittle or sticky foam
- Poor curing and reduced yield
Always follow the manufacturer’s instructions for tank preparation.
7. Change Nozzles Frequently
Spray foam begins curing immediately after exiting the nozzle. If you stop spraying for more than 20–30 seconds, the foam can harden inside the nozzle.
To avoid uneven spray patterns:
- Replace the nozzle after extended pauses
- Keep extra nozzles on hand
- Never try to reuse a clogged nozzle
This small step can save time and prevent costly mistakes.
8. Apply in Layers (Lifts), Not Thick Passes
Spray foam expands rapidly, and applying too much at once can cause:
- Excessive heat buildup
- Shrinkage or cracking
- Poor adhesion
Apply foam in thin layers (lifts) and allow each layer to expand and cure before adding more. This improves structural integrity and insulation performance.
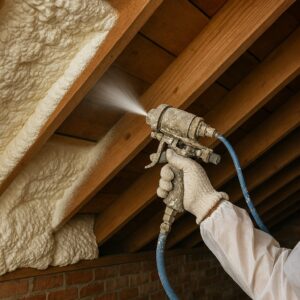
9. Follow Essential Safety Precautions
Spray foam kits are safe and effective when used correctly, but proper safety measures are essential. Always wear chemical-resistant gloves, eye protection, long sleeves, and a respirator or mask rated for chemical vapors to avoid skin, eye, and respiratory exposure.
Ensure good ventilation during and after application by opening windows and using fans to direct fumes outside. Keep children, pets, and unnecessary materials out of the work area, and avoid touching uncured foam. Apply foam in thin, controlled layers to prevent overheating and ensure proper curing.
Before starting, review the manufacturer’s safety guidelines and Safety Data Sheet (SDS) so you understand proper handling, storage, and disposal.
10. Follow Manufacturer Instructions Exactly
Every spray foam kit is slightly different. The most reliable way to ensure success is to follow the manufacturer’s instructions carefully.
This includes:
- Temperature requirements
- Spray distance
- Curing time
- Storage and disposal guidelines
Skipping steps or improvising can lead to poor results and void warranties.
Final Thoughts
Using a spray foam insulation kit doesn’t have to be complicated, but it does require attention to detail. By spraying continuously, maintaining proper temperatures, storing materials correctly, and applying foam evenly, you can achieve professional-grade results while avoiding common pitfalls.
If you’re looking to get the most out of your spray foam kit, following these top 10 spray foam application tips will help ensure efficiency, safety, and long-lasting insulation performance.