

That constant hissing sound from a toilet isn’t just a minor annoyance—it’s the sound of your operational budget draining away. A faulty toilet tank float valve is a critical point of failure in commercial properties, quietly wasting thousands of gallons of water and inflating utility bills.
For facility managers, addressing this small component (as well as other toilet water savers) is a key move in strategic asset management.
The Financial Drain of a Faulty Toilet Tank Float Valve
In any commercial property—be it a hotel, office park, or multi-family housing complex—utility costs are a huge line item. While managers often focus on large-scale energy conservation like HVAC and lighting, the humble toilet tank float valve can be an overlooked source of serious financial loss.
When this valve fails to create a proper seal or shut off completely, it creates a silent, continuous leak.
This “phantom leak” may seem insignificant on a per-toilet basis, but the cumulative effect across dozens or hundreds of units is staggering. A single malfunctioning toilet can waste up to 200 gallons of water per day. Now, multiply that across a 100-unit apartment building or a large office space.
This minor mechanical failure quickly turns into a major operational inefficiency, hitting your bottom line hard.
From Annoyance to Asset Management
Viewing a failing float valve as just another maintenance task is a common, and costly, mistake. Every hissing toilet represents a predictable and preventable expense. By proactively upgrading to modern, reliable float valves, you shift from a reactive repair model to strategic asset management.
This proactive approach pays off in several ways:
- Reduced Utility Bills: The most immediate impact is a measurable drop in water and sewer costs.
- Prevention of Water Damage: A complete valve failure can lead to overflows, causing costly damage to flooring, subflooring, and ceilings on floors below.
- Alignment with Sustainability Goals: Slashing water consumption helps meet corporate or municipal sustainability targets, which can really enhance your property’s reputation.
For facility managers, a toilet tank float valve isn’t just a piece of plumbing; it’s a control point for operational costs. A systematic upgrade program for these valves offers one of the highest and fastest returns on investment in water conservation.
The Evolution of Water Savings
The challenge of wasting water at the toilet is nothing new. Back in the late 19th century, Thomas Crapper’s invention of the floating ballcock was a massive leap forward, cutting the incredible waste from earlier, less reliable designs.
Today, swapping old hardware for modern, pressure-assisted or adjustable float valves continues this legacy of efficiency. We’ve seen these simple upgrades save 1-3 gallons per flush. Those savings quickly add up, aligning with the goals of property managers and utilities running retrofit programs.
Ultimately, effectively managing these components is about more than just fixing leaks; it’s about implementing simple, cost-effective measures to conserve resources. You can learn more about how to find and fix water leaks in our guide to simple water-saving devices.
By understanding the true cost of a faulty toilet tank float valve, you can make smarter decisions that protect both your property and your budget.
Choosing the Right Float Valve for Commercial Use
Picking the right toilet tank float valve for a commercial property isn’t just a minor repair—it’s a strategic decision. You’re not looking for a quick fix for a single bathroom; you need hardware that can take a beating day in and day out across an entire facility. A restroom in a busy hotel, office, or school faces demands that are a world away from residential use.
Your choice here directly impacts how often your maintenance team gets called out, how much water your facility uses, and what your operational costs look like long-term. For facility managers, it all comes down to finding that sweet spot of durability, easy maintenance, and compatibility with modern, water-saving toilets.
Understanding Commercial-Grade Valve Types
Not all float valves are built the same. In the commercial world, you’ll run into three main workhorse designs. Getting to know their strengths and weaknesses is key, whether you’re swapping out a single faulty valve or planning a full-scale retrofit across your property.
- Float-Cup Fill Valves: These have become the modern standard, and for good reason. Instead of an old-school floating ball on a long arm, a float-cup valve uses a compact cup that slides up and down the main valve shaft. They are incredibly easy to adjust, letting your team dial in the perfect water level for 1.6 GPF low-flow models or 1.28 GPF high-efficiency toilets. Their slim profile also means they’re less likely to get tangled up with other parts inside the tank. You can find reliable, adjustable float cup style valves like the HydroClean HCL660 on ConservationMart.com.
- Diaphragm-Style Fill Valves: You’ll spot these mostly in older buildings. They rely on a simple rubber diaphragm to shut off the water. While they were common for a long time, they’re notoriously susceptible to problems from sediment and hard water buildup. Minerals can cause the diaphragm to warp or get stiff, leading to a poor seal and constant running.
- Pressure-Activated Valves: These are the heavy-hitters. Built for buildings with high water pressure—a common situation in multi-story commercial properties—they are exceptionally durable. They deliver a fast, quiet refill, which makes them a premium choice for high-end applications where reliability and noise are big concerns.
If you’re planning a building-wide upgrade, do yourself a favor and standardize on one or two high-quality models. This move simplifies your parts inventory and makes sure your maintenance staff becomes an expert on that specific hardware, saving valuable time on every single service call.
Here’s a pro tip: Before you place a bulk order for new valves, have your team snap a quick photo of the inside of a few different toilet tanks around the property. This simple step confirms what you’re working with and helps you buy the right compatible parts, avoiding expensive ordering mistakes and project delays.
Commercial Toilet Tank Float Valve Comparison
To make the choice a little easier, here’s a quick rundown of how each valve type stacks up against the metrics that matter most in a commercial setting: durability, maintenance needs, and overall cost.
| Valve Type | Mechanism | Best For | Pros | Cons |
|---|---|---|---|---|
| Float-Cup Valve | A compact cup travels vertically on the fill valve shaft to shut off water. | General commercial use, HETs, and properties focused on precise water conservation. | Highly adjustable for water savings, reliable, compact design, easy to service. | Can be sensitive to debris in the water line if not flushed properly during install. |
| Diaphragm Valve | A rubber diaphragm flexes to control water flow, activated by a float arm. | Older properties where direct replacement of existing hardware is preferred. | Simple mechanism, very low initial cost. | Prone to failure from sediment, less precise water level control. |
| Pressure-Activated | Uses water pressure differentials to open and close the valve for filling. | High-rise buildings, facilities with high water pressure, or areas where noise is a concern. | Extremely durable, fast and quiet refill, handles high pressure without issue. | Higher initial purchase price, may require specialized parts for repairs. |
At the end of the day, investing in a quality toilet tank float valve is just smart business. For a deeper dive into upgrading your fixtures, our guide on how to retrofit your toilet for maximum efficiency offers some great insights to go along with your hardware choices. When you match the right valve to your facility’s needs, you cut down on maintenance calls, save thousands of gallons of water, and bring down your utility overhead.
A Professional’s Guide to Float Valve Installation
When you’re dealing with toilets in a commercial building, swapping out a float valve isn’t just a simple repair—it’s an operational necessity. Every minute of downtime and every callback costs money. This guide is for the pros; we’re skipping the basic steps and jumping straight into the best practices that ensure you get the job done right the first time, creating a solid, leak-free seal that supports your facility’s water conservation goals.
Any big replacement project, especially when you’re tackling multiple units, starts before you even touch a wrench. In a commercial space, the first step is communication. You’ve got to give staff and tenants plenty of notice before you shut the water off. Nothing sours a relationship faster than an unexpected outage in a residential or hospitality setting.
Once the supply is shut down, you can get to work. Let’s be honest: in high-traffic restrooms, corroded hardware and brittle supply lines are what you expect to find. Always plan on replacing the supply line right along with the float valve. It’s a minor added cost that prevents a major flood down the line. It’s cheap insurance.
Pre-Installation Best Practices
Before you even think about dropping that new valve into the tank, you need to prep the surface. This is the step where a lot of installations go wrong, leading to those slow, silent leaks that completely undermine your water-saving efforts. Don’t just give the tank a quick wipe. You need to thoroughly clean the porcelain around the fill valve opening.
My number one tip here is to get all the old gasket gunk and sediment off the porcelain base inside the tank. Even a tiny piece of grit or mineral buildup can compromise the seal, creating a microscopic gap that will waste hundreds of gallons of water over time.
Taking a few extra seconds to do this ensures the new gasket seats perfectly against smooth porcelain. That perfect seal is the foundation of a repair that lasts.
Seating and Securing the New Valve
With a clean tank surface, it’s time to install the new toilet tank float valve. Always start by hand-tightening the locknut on the underside of the tank. This prevents cross-threading. After it’s finger-tight, give it a final quarter- to half-turn with a wrench. You’re aiming for snug, not strained. Overtightening is a classic rookie mistake, and it’s a fast way to crack the porcelain tank—turning a five-minute job into a full toilet replacement.
- Gasket Check: Look to see that the rubber gasket is evenly compressed. It shouldn’t be bulging or pinched on one side.
- Alignment: Make sure the new valve is positioned so the float arm or cup can move up and down freely without hitting the tank walls or the flapper.
- Refill Tube Placement: The little refill tube is critical. It must be clipped securely to the top of the overflow pipe, pointing water down into it. If you just let it dangle loose inside the pipe, it can create a siphon that silently drains water from the tank 24/7.
This visual process lays out the key stages for a successful upgrade, from identifying your needs to getting the installation just right.
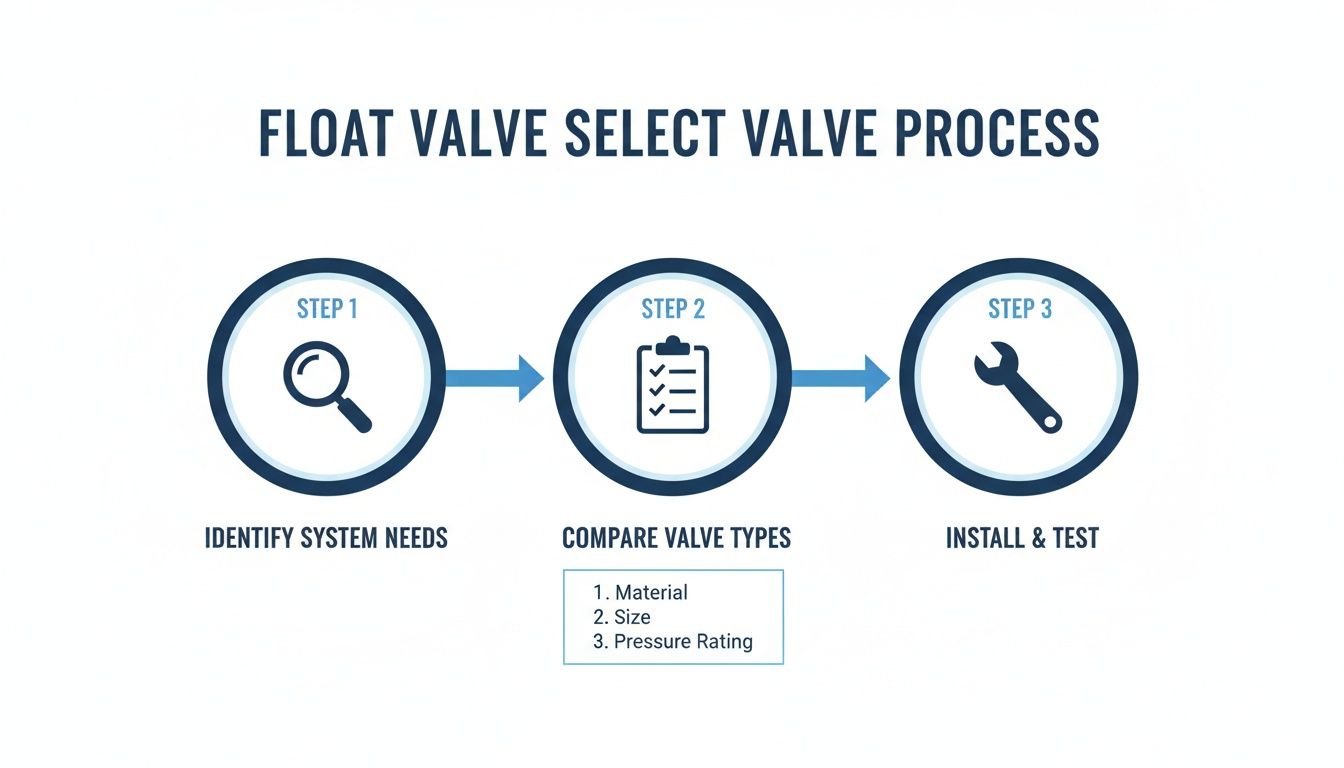
Following a logical flow like this prevents callbacks and makes sure you’re getting the water savings you were promised.
Final Connections and Initial Testing
With the valve secure, go ahead and reconnect your new, flexible supply line. Again, hand-tighten the connections first at both the shutoff valve and the fill valve shank, then give them a final gentle turn with a wrench. These compression fittings are a common source of nuisance drips if they aren’t properly tightened.
Now, slowly turn the water back on. As the tank fills, keep a close eye on all your connection points for any sign of moisture. Watch that first fill cycle to be sure the float rises smoothly and shuts the water off completely at the correct level—usually about one inch below the top of the overflow pipe. Run a few test flushes to make sure everything cycles correctly.
While this guide covers the essentials, some building-wide retrofits or stubborn leak issues might call for a deeper level of expertise. In those cases, bringing in a team that offers expert plumbing services can save a lot of headaches. And if you’re looking to expand your conservation efforts, our water conservation kit installation guide has more great tips that go hand-in-hand with a float valve upgrade.
Dialing In Your New Valve for Maximum Water Savings
Putting in a new toilet tank float valve is a great start, but the job isn’t done until you’ve calibrated it. This is where you lock in the real ROI. For facility managers, this final tweak is what turns a simple hardware swap into predictable, measurable water savings that justify the upgrade.
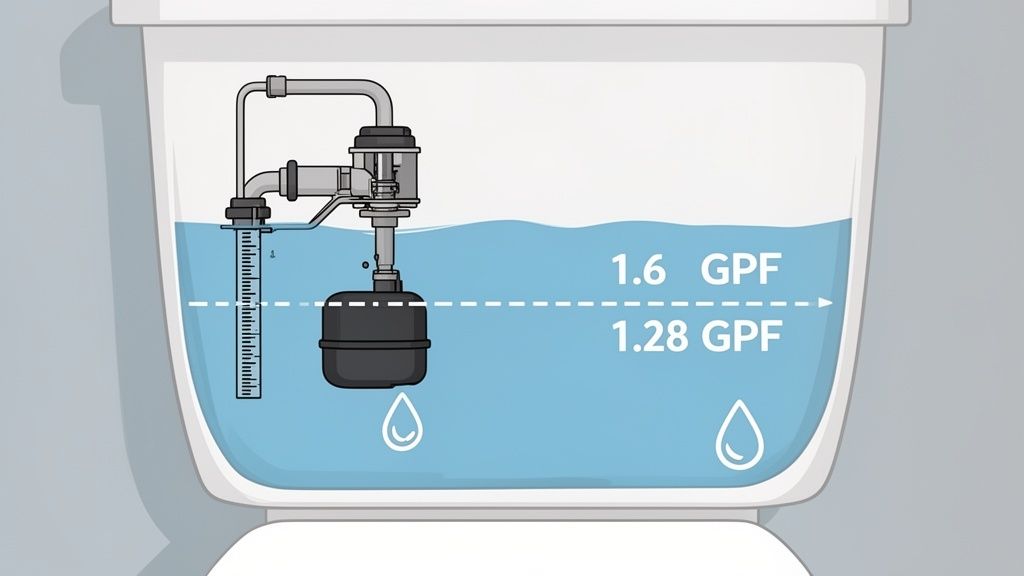
The entire point is to get the water level exactly where the manufacturer intended, whether it’s a 1.6 gallons per flush (GPF) model or a newer 1.28 GPF high-efficiency toilet. You can almost always find this info stamped right on the porcelain, either inside the tank or down near the base of the toilet.
It’s easy to dismiss a water level that’s just a half-inch too high, but when you scale that across a whole facility, the waste is staggering. In a building with 100 toilets, that tiny bit of extra water can add up to thousands of wasted gallons every year. This is how a small part replacement directly cuts down your utility bills.
Nailing the Perfect Water Level
The adjustment itself is usually straightforward. On modern float-cup style valves, you’re just looking for a screw or clip that moves the float up or down, changing the shut-off point.
- Find the Water Line: Most commercial toilets have a faint line marked inside the tank or on the overflow pipe. That’s your target.
- Adjust in Small Increments: Give the adjustment screw on top of the fill valve a small turn—a quarter-turn is often enough to make a noticeable difference.
- Flush and Check: After each adjustment, give it a flush and let the tank fill completely. Then see where the water stops relative to that manufacturer’s mark.
- Get it Just Right: The sweet spot is typically about one inch below the top of the overflow pipe. This gives you full flushing power without a drop of wasted water.
Use a Dye Test to Confirm a Leak-Free Seal
Even a perfectly set valve won’t save you a dime if there’s a slow leak somewhere else. Before you pack up your tools, a quick dye test is the only way to be sure. It’s the easiest method for catching a “phantom flush” from a worn-out flapper or a bad seal.
Here’s how to do it:
- Once the tank has refilled, add a few dye tablets or some food coloring to the tank water.
- Leave it alone. Don’t flush.
- Come back in 15-20 minutes.
- Look in the toilet bowl. If you see any color, you’ve got a slow leak that needs fixing.
This simple check is non-negotiable. It verifies the entire tank system—not just the part you replaced. It’s the step that ensures your water-saving efforts aren’t being sabotaged by a cheap, faulty flapper.
Today’s efficient toilets are the product of over a century of innovation, starting with the move from high-up tanks to the close-coupled designs we see now. That shift was a massive leap for the toilet float valve. We have solid data showing that retrofitting old float valves in commercial buildings can slash flush volume by 30-50%. For a facility with 50 toilets, that can mean savings of up to 100,000 gallons a year. You can learn more about the fascinating history and evolution of toilet efficiency.
One Last Check: The Refill Tube
Before you call it done, glance at the small rubber refill tube. It absolutely must be clipped to the top of the overflow pipe, aiming a stream of water down into it while the tank fills. If that tube gets shoved too far down the pipe or is just left dangling in the tank, it can create a constant siphon, quietly draining water 24/7. Checking its position takes five seconds and prevents one of the most common—and wasteful—installation mistakes.
Troubleshooting Common Float Valve Issues
Even the most durable hardware gives out eventually, especially in a high-traffic commercial building. Your toilet tank float valve is a workhorse, but when things go wrong, you need to diagnose the problem fast to keep toilets in service and stop water from being wasted.
One of the most common—and costly—problems we see is the dreaded “ghost flush” or constantly running toilet. It’s usually a silent internal leak, where water trickles from the tank into the bowl. It might not seem like much, but that small stream can waste thousands of gallons over time, quietly driving up utility costs across your entire facility.
Most of the time, the culprit is a worn-out or misaligned flapper that just can’t create a perfect seal anymore. But don’t overlook the float valve itself. If it’s set too high, the water level will creep over the top of the overflow tube, creating the exact same problem.
Dealing With Slow or Noisy Refills
When you get a call that a toilet is taking forever to fill, it almost always points to an obstruction. This is a classic issue in older buildings. Sediment and mineral deposits from aging pipes can break loose and clog the tiny inlet screen on a fill valve, choking off the water flow. If you find your toilet cistern not filling, a clog is the first thing to check.
Another frequent complaint is a noisy refill, often a loud banging or vibrating sound known as water hammer. This usually happens in facilities with high water pressure—often anything over 80 PSI—that overwhelms valves not rated for the job. The valve literally struggles to close against that intense pressure, causing it to shudder and send noise echoing through the pipes.
To get to the bottom of these issues, have your team run through a quick diagnostic checklist:
- Check the Shutoff Valve: It sounds simple, but make sure the water supply valve behind the toilet is cranked all the way open. A partially closed valve will definitely slow down the refill.
- Clean the Fill Valve Inlet: After turning off the water, pop the top off the fill valve and check for gunk. Flushing out any built-up sediment is often all it takes to restore normal flow.
- Measure Building Water Pressure: If water hammer is a recurring nightmare across multiple units, get a pressure gauge and test the building’s water pressure. You might need a pressure-reducing valve on the main supply to protect the whole plumbing system.
For facility managers, repeat service calls for the same issue are a massive drain on resources. Giving your team a clear troubleshooting process for the toilet tank float valve turns them from reactive fixers into proactive problem solvers, which saves everyone time and money.
Solving Common Float Valve Problems
Here’s a quick-glance table your maintenance staff can use to connect common symptoms to their likely causes and get right to the fix.
| Symptom | Likely Cause(s) | Professional Solution |
|---|---|---|
| Constantly Running Toilet | Worn flapper; incorrect water level; stuck fill valve. | Replace the flapper with a durable, commercial-grade model. Adjust the float to set the water level 1 inch below the overflow tube. |
| Slow Tank Refill | Partially closed shutoff valve; sediment clogging the fill valve. | Confirm the supply valve is fully open. Disassemble and clean the fill valve inlet screen to remove debris. |
| Loud Banging or Hissing | High water pressure causing water hammer; worn valve seals. | Install a fill valve rated for high pressure. If the issue is widespread, consider a pressure-reducing valve for the building. |
| Weak or Incomplete Flush | Water level set too low; incorrect refill tube placement. | Calibrate the float to raise the water level to the manufacturer’s mark. Ensure the refill tube is clipped and directing water into the overflow pipe. |
Common Questions from Facility Managers
When you’re managing plumbing systems across multiple properties, you need straight answers, not fluff. Here are some of the most common questions we get from facility managers, contractors, and purchasing agents about toilet tank float valves. The goal here is to give you the key takeaways you need to make the right call for your buildings.
How Often Should We Replace Float Valves in a Commercial Building?
This is a big one. In a high-traffic commercial building, a float valve’s lifespan is much shorter than in a typical residence. Being proactive is the only way to head off major water waste and those dreaded emergency repair calls.
We tell our clients to build annual inspections into their regular plumbing maintenance schedule. More importantly, it’s smart to get on a planned replacement cycle of every 3-5 years. For places with really heavy use—think stadiums, airports, or buildings with notoriously hard water—you’ll probably want to tighten that cycle up. If you hear hissing, notice slow refills, or see any corrosion, those are your immediate red flags to replace a valve right away.
Are Universal Float Valve Kits a Good Choice for Our Properties?
Universal kits can be a lifesaver, especially when you’re doing a large-scale retrofit. They make purchasing way simpler and help your maintenance team keep a lean inventory, since one kit fits most standard toilets. That’s a huge operational advantage.
The trick, however, is to stick with commercial-grade kits. You want something known for durability and precise adjustment capabilities. And while they do cover most bases, just be aware that you might have some oddballs—like pressure-assisted toilets or really old, non-standard models—that will still need a specific OEM part.
Here’s a pro tip: Before you place a bulk order, buy a few universal kits and pilot them on different toilet models in your facility. This simple test run confirms compatibility and can save you from a very expensive purchasing mistake. It helps your whole project get off to a smooth start.
How Does Building Water Pressure Affect Float Valve Performance?
Water pressure is a critical factor that often gets overlooked in commercial settings. These buildings frequently run at higher pressures, sometimes pushing well over 80 PSI. That kind of force can completely overwhelm a standard, residential-grade float valve.
When you have a mismatch like that, a few problems pop up:
- Loud Noises: High pressure is the main culprit behind water hammer—that jarring bang you hear in the pipes after a flush.
- Premature Failure: The internal seals and plastic parts just can’t take the stress. They wear out fast.
- Constant Leaks: The valve struggles to shut off completely, which leads to that silent, but costly, continuous water flow into the bowl.
When you’re speccing out new valves, always check that they’re rated for higher pressures. If you know your building’s pressure is consistently high, investing in pressure-reducing valves for the main supply lines is a smart move that protects your entire plumbing system, not just the toilets.
Can Upgrading Just the Float Valve Make a Real Difference?
Absolutely. It’s one of the fastest and most cost-effective upgrades you can make for water conservation. While swapping out the entire toilet for a high-efficiency model will give you the biggest savings, a targeted float valve upgrade delivers a fantastic return on investment.
Think about it: a single, slightly leaking or improperly set valve can quietly waste hundreds of gallons of water every day. When you replace it with a modern, adjustable valve and dial in the correct water level, you stop that waste cold. Now, multiply that across dozens or even hundreds of toilets in your portfolio. The financial and water savings add up fast.
At Conservation Mart, LLC, we stock the high-quality, durable plumbing components facility managers need to cut utility costs and hit their sustainability targets. You can explore our full selection of water-saving products and find the right solutions for your properties by visiting us at the Energy & Water Conservation Blog.