
For the savvy homeowner or DIY enthusiast, small air leaks are more than a nuisance—they’re money leaking out of your home. DIY spray foam kits are the perfect tool for these targeted strikes, letting you tackle energy waste without hiring a professional for a massive insulation job.
Think of it as surgical air sealing. You can hit gaps around windows, doors, and plumbing penetrations with precision. Insulating a drafty rim joist or sealing up hidden attic bypasses becomes a quick, high-impact weekend project. This is how you can achieve professional results on smaller projects, boosting your home’s comfort and cutting down on energy bills.
Top Insulation Foam Spray DIY Uses in Your Home
This is where DIY kits really shine for home improvement. Instead of calling in a full crew for a minor but critical task, you can use a portable kit like a Foam it Green kit to solve nagging air leaks and cold spots on the spot. It’s an ideal solution for retrofits, finishing a basement, or any project where improving energy efficiency is a goal.
The magic is in the spray polyurethane foam (SPF) itself. It sprays as a liquid and expands on contact, creating a seamless, airtight barrier that fills every last crack and crevice. It stops energy loss right at the source, something traditional insulation just can’t do.
Understanding Foam Types for Your Project
Picking the right foam is half the battle. Your success hinges on matching the foam’s properties to the job’s demands. There are two main players on the field.
- Closed-Cell Foam: This stuff is the heavy hitter. It’s rigid, dense, and packs a high R-value (that’s its thermal resistance). More importantly, it acts as a complete air and vapor barrier. Its structural strength makes it perfect for tough jobs like insulating foundation walls or rim joists.
- Open-Cell Foam: Think of this as the softer, more flexible option. Open-cell foam is fantastic for filling large, non-structural cavities and is an amazing sound dampener. It is vapor-permeable, which is a key feature in certain wall assemblies where you need moisture to be able to escape.
The demand for this technology is exploding. With spray foam expected to hold 41% of the global insulation market by 2025, its growth is being fueled by sky-high energy costs and the push to make older buildings more efficient.
In North America, building codes like IECC 2021 are practically pushing homeowners toward spray foam. Why? Because it works. We’ve seen it trim HVAC loads by as much as 25% in residential homes, a massive cost-saver.
High-Impact DIY Applications
If you’re applying this stuff yourself, finding the right projects is key to getting the most out of your efforts. For some great ideas on generating project ideas, you can see how pros think about it with these 7 Creative Ways To Generate Leads For Your Home Improvement Company. Focusing on high-value applications is always a winning strategy.
Here’s a quick rundown of the most common jobs where DIY spray foam kits deliver serious, tangible benefits for your home.
Quick Guide to Common Insulation Foam Spray DIY Uses
This table breaks down the best places to target with DIY spray foam, helping you deliver maximum impact with minimal hassle.
| Application Area | Primary Goal | Typical Foam Type | Key Benefit for Homeowners |
|---|---|---|---|
| Rim Joists & Sill Plates | Eliminate major air leakage | Closed-Cell | Drastically reduces drafts and energy loss right at the foundation. |
| Pipe & Wire Penetrations | Seal gaps around utilities | Closed-Cell | Prevents air, moisture, and pest intrusion through walls and floors. |
| Attic Bypasses | Close hidden air pathways | Open or Closed-Cell | Stops conditioned air from escaping into the attic, improving comfort. |
| Soundproofing Rooms | Dampen noise transfer | Open-Cell | Creates quieter home offices, bedrooms, or home theaters. |
By zeroing in on these areas, you can tackle the biggest sources of energy waste with minimal disruption. It’s a surefire way to get an immediate, measurable return on your project.
Choosing the Right Kit: Open-Cell vs. Closed-Cell Foam
Picking the right spray foam kit isn’t just a minor detail—it’s one of the most important decisions you’ll make for your project. Get it right, and you’ve got a high-performance, durable insulation solution. Get it wrong, and you could be looking at poor thermal performance, moisture problems, or even bigger headaches down the road.
While both open-cell and closed-cell foams insulate, their internal structures are completely different. That difference is what makes each one suited for very specific jobs. This isn’t just about R-value; it’s about how the foam handles moisture, whether it adds strength, and its long-term value.
The Powerhouse: Closed-Cell Foam
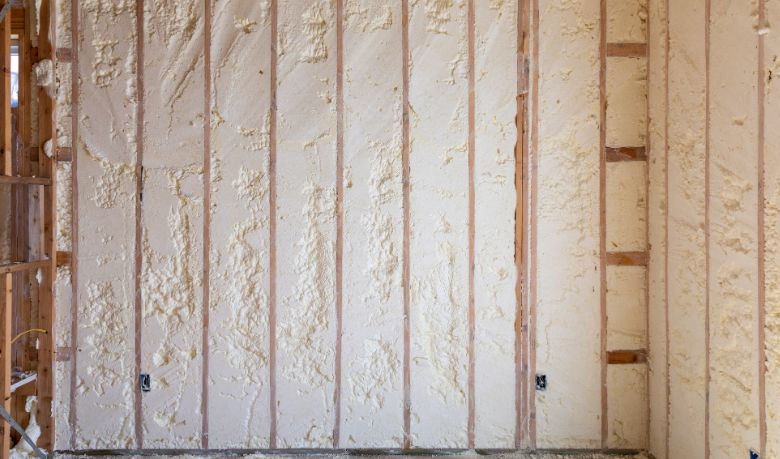
When a job calls for maximum insulating power and toughness, closed-cell spray foam is the undisputed champ. Its structure is dense and rigid, made up of tiny, individual gas pockets that are completely sealed off from one another. Think of it like a solid plastic honeycomb—each cell is its own little barrier against heat, air, and water.
This unique design gives it some serious advantages:
- Impressive R-Value: Closed-cell foam delivers a high thermal resistance, usually between R-6 to R-7 per inch. This means you get a lot of insulating power in a thin layer, which is perfect for tight spots like wall cavities or anywhere you can’t afford to lose space.
- Structural Rigidity: Once it cures, closed-cell foam is incredibly strong. It bonds like glue to whatever you spray it on and can actually add structural reinforcement to walls and sheathing. It’s like getting insulation and a structural upgrade in one shot.
- Built-in Vapor Barrier: Because all those tiny cells are sealed, moisture can’t get through. Closed-cell foam acts as an all-in-one air barrier, vapor barrier, and thermal barrier. You won’t need to install a separate vapor retarder, making it a critical choice for basements, foundation walls, and other damp-prone areas where stopping condensation is everything.
These qualities make closed-cell foam the go-to for tough applications like rim joists, basement walls, and any spot that needs a heavy-duty barrier against the elements.
The Specialist: Open-Cell Foam
If closed-cell foam is the workhorse, then open-cell is the specialist. It has a completely different feel—it’s soft, light, and flexible because its cells are interconnected and left “open.” The structure is more like a dense sponge, and the fact that air and vapor can move through it is actually a huge benefit in certain situations.
Open-cell foam really shines in a few key areas:
- Superior Sound Dampening: The soft, spongy texture of open-cell foam makes it an amazing sound absorber. If you’re insulating interior walls between rooms, home theaters, or offices, it does a fantastic job of deadening noise transmission.
- Vapor Permeability: Unlike its rigid cousin, open-cell foam lets water vapor pass right through. This is a game-changer in some building designs and climates, because it allows the structure to breathe and dry out if it ever gets wet. Trapped moisture is the enemy, leading to rot and mold, and open-cell foam helps prevent that.
- Cost-Effectiveness for Volume: Open-cell foam expands like crazy, much more than closed-cell. That means a single kit can cover a much larger area, making it a budget-friendly choice for filling large, open cavities like attic rooflines where a vapor barrier isn’t needed.
For a deeper look into the science and best uses, check out our detailed guide on closed-cell vs. open-cell polyurethane foam.
DIY Insight: The choice often boils down to moisture control. In a cold climate, you’d use impermeable closed-cell foam on a basement wall to stop warm, moist indoor air from hitting the cold concrete and condensing. But in a hot, humid climate, you might use permeable open-cell foam in an unvented attic to let the roof deck dry toward the inside, preventing moisture buildup.
Getting these differences straight is fundamental for anyone tackling a DIY spray foam project. The table below breaks it down even further to help guide your decision.
Open-Cell vs. Closed-Cell Spray Foam Comparison
To help you choose the right foam for your job, here’s a quick side-by-side look at what sets these two types apart.
| Feature | Open-Cell Foam | Closed-Cell Foam |
|---|---|---|
| R-Value per Inch | R-3.5 to R-4 | R-6 to R-7 |
| Structure | Soft, flexible, and light | Rigid, dense, and strong |
| Air Barrier | Yes (Excellent air sealant) | Yes (Excellent air sealant) |
| Vapor Barrier | No (Vapor permeable) | Yes (Impermeable to vapor) |
| Sound Dampening | Excellent | Good |
| Structural Strength | No | Yes (Adds rigidity) |
| Common Uses | Interior walls, soundproofing | Rim joists, foundations, crawl spaces |
Ultimately, the best choice depends entirely on where and why you’re insulating. Consider the specific needs of your project—moisture exposure, structural requirements, and budget—to make the right call.
Strategic Air Sealing: Top DIY Uses for Maximum Impact
Knowing the difference between foam types is one thing, but getting real energy savings means putting that knowledge to work in the right places. For DIYers, the goal is always to find the “quick wins”—those high-impact areas where a little effort makes a huge difference. Strategic air sealing with DIY spray foam is the best way to plug the most common and expensive energy leaks in any building.
Many of these critical weak spots get missed during standard insulation jobs, leaving them as secret drains on your heating and cooling budget. By hitting these specific areas, you can make an immediate, measurable difference in your home’s performance.
Targeting Rim Joists and Sill Plates
One of the biggest culprits for air leakage in any home is where the foundation meets the main structure. This spot, known as the rim joist (or band joist) and sill plate, is notoriously tough to seal with old-school insulation. You can stuff fiberglass batts into the cavities, but that does absolutely nothing to stop air from whistling through the countless tiny gaps and cracks.
This is exactly where DIY spray foam delivers results no other product can match. A layer of closed-cell spray foam applied directly to the rim joist creates a seamless, airtight, and insulated barrier all in one shot.
- It Stops Airflow: The foam expands to fill every single seam, crack, and joint, completely killing drafts at the source.
- It Prevents Condensation: Closed-cell foam is a vapor barrier. It stops warm, moist indoor air from hitting the cold foundation surfaces, which is a key way to prevent mold and rot.
- It Boosts R-Value: You’re adding insulation right where thermal bridging and heat loss are worst.
Sealing just this one area can have a massive impact on your home’s energy bills and how comfortable it feels inside.
Sealing Around Pipes and Wires
Every single pipe, wire, and duct that punches through a wall, floor, or ceiling is a potential highway for air to leak out. Add them all up, and these small penetrations can be the equivalent of leaving a window wide open all year long. Caulk might work for the tiniest gaps, but it cracks over time and is useless for larger, messier openings.
DIY spray foam is the final word on sealing these penetrations. It expands to fit any shape perfectly, creating a permanent, durable seal around:
- Plumbing pipes
- Electrical conduits
- HVAC ductwork
- Ventilation stacks
A quick shot of foam around each opening instantly stops drafts, moisture, and even pests from getting in. For homeowners, this is a fast, high-value task you can knock out with a portable kit. To find these leaks in the first place, you can use simple tools. For a great rundown on how that’s done, check out our guide on using a smoke puffer to identify air leaks.
Tackling Complex Attic Bypasses
The attic is a major battleground for energy loss, and not just through the ceiling. “Attic bypasses” are hidden air channels that let the conditioned air you paid for escape right up into the attic. These are almost always in awkward, hard-to-reach spots where fiberglass batts just can’t create a seal.
Key Insight: Air sealing is often more important than just piling on more R-value. An attic with R-60 insulation will still bleed energy if it isn’t air sealed first. Spray foam does both jobs at once.
Common attic bypasses are found around chimney chases, dropped soffits over kitchens and bathrooms, and where interior walls meet the attic floor. DIY spray foam insulation is tailor-made for these tricky spots. It expands into gaps you could never reach otherwise, creating a perfect, permanent seal.
Closing up these bypasses is one of the single most effective things you can do with DIY spray foam to boost your home’s performance. It’s no surprise the global spray foam market is projected to grow from USD 2,181.5 million in 2025 to USD 4,452.1 million by 2035. This boom is happening because spray foam can slash heating and cooling bills by 20-50% in many situations, offering a clear and powerful return on investment for your home.
Getting a Safe, Professional Finish Every Time
While DIY spray foam kits are made to be user-friendly, getting that flawless, professional-grade result comes down to two things: solid technique and a serious commitment to safety.
The chemical reaction that makes this high-performance foam is a sensitive one. If you cut corners, you can end up with bad adhesion, patchy results, or even create safety hazards. It helps to think of this not just as an insulation project, but as a chemical installation that demands your full attention from start to finish.
A successful job means you’re in control of your environment. Everything from the temperature of the surface you’re spraying to the air in the room plays a part. Nailing these details is what separates a tough, airtight seal from a messy, failed attempt that’s a headache to fix.
Essential Surface Preparation
Good prep work is everything. If you want that permanent, powerful bond, the foam needs a clean, dry, and stable surface to grab onto. Skipping this step is the fastest way to adhesion failure—where the foam just peels right off, wasting your time, money, and material.
Before you even think about pulling the trigger, make sure the area is totally free of dust, grease, oil, and any loose bits of debris. A quick wipe-down or vacuum can make all the difference. Most importantly, the surface has to be bone dry. Moisture is the ultimate enemy of spray foam; it messes with the chemical curing process and will stop the foam from sticking properly.
Temperature is Non-Negotiable: Pay close attention to the temperature of both the surface (what pros call the “substrate”) and the air around you. Most kits are designed to work in a specific range, usually between 65°F and 85°F. If the surface is too cold, the foam won’t expand right and can cure brittle. Too hot, and the reaction happens too fast, leading to a weak foam structure. Always, always check the manufacturer’s guide for their specific temperature rules.
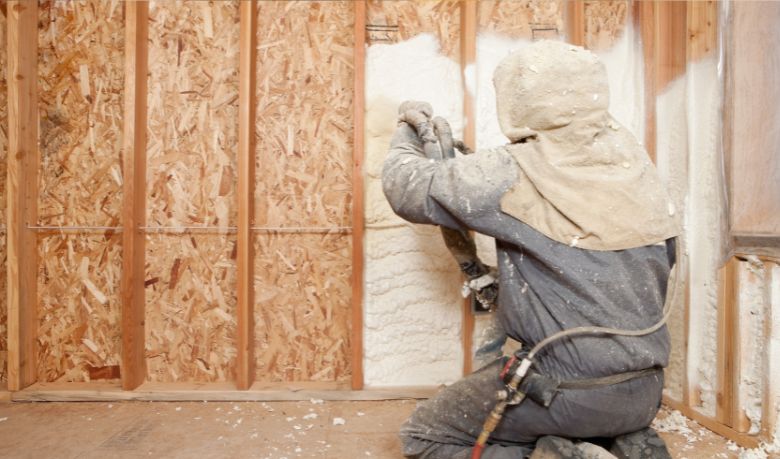
Personal Protective Equipment (PPE) Isn’t a Suggestion
When you’re working with two-component spray foam, you’re dealing with chemicals that can be harmful if you’re exposed to them. As you spray and the foam cures, it “off-gasses,” releasing vapors you absolutely should not be breathing. Protecting yourself isn’t optional—it’s a mandatory part of doing the job right.
Your personal protective equipment (PPE) is your first and most critical line of defense. Here’s the minimum gear you need:
- A NIOSH-approved respirator with organic vapor cartridges: This is non-negotiable for protecting your lungs from chemical fumes. A simple dust mask is not good enough.
- Safety glasses or goggles: You need to shield your eyes from chemical splashes and overspray.
- Chemical-resistant gloves: Nitrile or butyl gloves are a must to keep this stuff off your skin.
- Full-body disposable suit: This protects your skin and clothes. Once this foam cures on fabric, it’s pretty much there for good.
For a deeper dive into getting your project set up for success, check out our guide on the top 10 tips for spraying spray foam kits.
Why Safe and Effective Ventilation is Critical
Proper ventilation is just as important as wearing your PPE. While you’re spraying, you need to create active airflow to safely pull the chemical vapors out of your workspace. This is more than just cracking a window; it requires a real air exchange strategy.
Set up a couple of box fans in windows or doorways to create cross-ventilation. The idea is to have one fan pulling fresh air in and another on the opposite side pushing the contaminated air out. This constant airflow keeps you safe and helps the foam cure correctly.
After you’re done spraying, keep the area well-ventilated for at least 24 hours (or whatever the manufacturer specifies). This allows the foam to fully cure and finish off-gassing before anyone re-enters the space without full PPE. A disciplined approach here ensures everyone’s safety and gives you the best possible result for your project.
Troubleshooting Common DIY Spray Foam Problems
Even with the best planning, laying down two-component spray foam can throw you a curveball. Learning to spot and fix common problems on the fly is a crucial skill, and a small tweak to your technique or environment can mean the difference between a perfect air seal and a costly mess.
Most issues you’ll encounter with insulation foam spray DIY uses boil down to one of three things: the surface, the temperature, or the chemical mix. If you can recognize the warning signs early, you can pause, fix the root cause, and get back to spraying with confidence.
Diagnosing Poor Adhesion
One of the most common headaches is foam that just won’t stick. You might see it peeling away from the substrate or failing to bond in the first place. Nine times out of ten, this points directly back to a poorly prepped surface. Foam needs a clean, dry, and solid base to create that permanent chemical bond.
Before you try again, take a hard look at the application area for these usual suspects:
- Moisture: Even a little bit of dampness on a surface will ruin the curing process and kill adhesion. Make sure the substrate is bone dry.
- Contaminants: Things like dust, dirt, grease, and oil act as a barrier between the foam and the surface it needs to bond to. Give the area a thorough cleaning before you proceed.
- Loose Debris: Remember, the foam will stick to whatever is on the surface. If you spray over loose paint, flaking rust, or crumbling wood, the foam will just peel right off along with that unstable layer.
Correcting Off-Ratio Foam
Properly cured foam should be rigid (for closed-cell) and feel solid. If you notice your foam is brittle and crunchy, or if it stays soft and spongy long after it should have hardened, you’ve probably got an off-ratio mix. This means the two chemical components—the “A-side” and “B-side”—aren’t coming out of the gun at the correct 1:1 ratio.
An off-ratio mix is a serious problem. It completely undermines the foam’s integrity, tanking its R-value and leaving you with a failed air seal.
DIY Tip: Off-ratio foam is almost always a temperature problem. If the chemical tanks are too cold, the liquids get thick and viscous, and they can’t flow properly through the gun and nozzle. Always get the tanks warmed up to the manufacturer’s recommended temperature before you even think about starting to spray.
It’s also worth checking the nozzle for any clogs that might be blocking one of the chemical streams. But if the problem continues after you’ve warmed the tanks and swapped out the nozzle, the kit itself could be faulty. Still, temperature is the culprit in over 90% of ratio problems.
Managing Uncontrolled Expansion
A classic rookie mistake is applying too much foam, too fast. This stuff expands like crazy—sometimes up to 100 times its liquid volume. Underestimating that expansion leads to messy overfills, drips, and a ton of wasted material. The key here is disciplined technique.
- Adjust Your Technique: Apply the foam in thin, even layers. Aim for about one inch at a time, then give it a few minutes to set up before you add the next layer.
- Control Your Speed: Move the spray gun at a steady, consistent pace. If you linger too long in one spot, the foam will build up, sag, and make a mess.
- Watch the Temperature: If the surface you’re spraying is too hot, the foam can react too quickly and expand out of control.
By keeping these common pitfalls in mind, you can troubleshoot effectively on the job. This ensures every application of insulation foam spray results in the durable, high-performance air seal you’re aiming for, preventing callbacks and delivering real energy savings.
Your Questions Answered About DIY Spray Foam
When you’re dealing with insulation, especially something as effective as spray foam, a lot of practical questions come up. Whether you’re finishing a basement, upgrading your attic, or just trying to make your home more comfortable and efficient, you need straight answers. Let’s get into the most common questions we hear from DIYers.
Can DIY Spray Foam Kits Really Deliver Professional-Grade Results?
For targeted air sealing and smaller insulation jobs, the answer is an absolute yes. Think about it: modern DIY spray foam kits are designed specifically for these kinds of tasks—sealing up a drafty rim joist, insulating around a mess of pipes, or closing off those sneaky attic bypasses. Bringing in a full-scale rig for these jobs is overkill and just doesn’t make financial sense.
These kits use the same high-performance, two-component polyurethane foam you’d find in the big professional systems. That means you can get the exact same R-values, airtightness, and durability when you apply it correctly. The foam itself isn’t the variable here; the execution is what matters.
Success really boils down to three things:
- Good Surface Prep: The surface has to be clean, dry, and free of anything that could get in the way of a good bond.
- Temperature Control: You have to keep an eye on the temperature of both the chemical tanks and the surface you’re spraying.
- Proper Technique: Apply the foam in thin, controlled layers. This lets you manage the expansion and build up to the thickness you need.
When you’re doing repairs, retrofits, or targeted energy upgrades, these kits aren’t a compromise. They’re often the smartest tool for the job.
What’s the Typical ROI on a DIY Air Sealing Project?
The return on investment for air sealing is incredibly fast, which is why it’s one of the most compelling energy efficiency upgrades out there. For most homes, you can often recoup the initial investment in energy savings within just one to three years.
Air leakage is a massive energy drain, sometimes responsible for up to 40% of a home’s total heating and cooling costs. When you use a DIY spray foam kit to seal those major gaps and penetrations, you slash that energy consumption immediately.
For the average home, this can easily add up to hundreds of dollars in real, documented savings every year. That makes targeted air sealing a high-impact, low-risk investment for any homeowner looking to cut down on utility bills.
How Do I Figure Out How Much Foam I Need?
Estimating your materials correctly is key to avoiding shortages or wasting money. Spray foam yield is measured in board feet. It’s a simple concept: one board foot is a 12-inch by 12-inch square, insulated one inch thick.
To calculate what your project needs, just use this formula:
Total Square Footage of Area (Length x Width) x Desired Foam Thickness (in inches) = Total Board Feet Needed
Let’s say you’re insulating a 100-square-foot section of a wall and want a 3-inch layer of closed-cell foam. The math looks like this:
100 sq. ft. x 3 inches = 300 board feet
It’s always smart to buy a kit with a slightly higher yield than you calculate. This gives you a buffer for any variations in your spraying technique or minor overspray, ensuring you have enough foam to finish the job right. All the professional-grade kits on ConservationMart.com clearly list their board foot yield to make buying easy.
Is It Possible to Get Rid of Cured Spray Foam?
Yes, you can remove cured spray foam, but it’s a physical job. Once spray polyurethane foam has fully cured, it becomes a hard, rigid solid that sticks like crazy. There are no solvents or chemicals that will just dissolve it away.
To get it off, you have to physically cut, scrape, or sand it away from the surface. This is exactly why careful prep work and masking off surrounding areas is so important before you start spraying. Protecting window frames, electrical boxes, or finished floors will save you a huge cleanup headache later.
If you do get some overspray or apply too much, the best thing to do is wait for the foam to completely cure. Trying to wipe up wet or tacky foam is a nightmare and usually just spreads the mess. Once it’s hard, a sharp utility knife or a serrated blade is your best bet for trimming away the excess.
At Conservation Mart, LLC, we’ve got the professional-grade kits and the expert knowledge to help you tackle energy waste head-on. Check out our resources and find the right products for your next project over at the Conservation Mart Blog.